
You're scrolling through your phone during your commute. Checking emails at your desk. Texting friends while waiting in line. By the end of the day, your neck aches, your shoulders feel tight, and you catch yourself in the mirror—head jutting forward, looking older and more tired than you feel inside.
What Is Text Neck?
Text neck is a condition that develops from repeatedly looking down at smartphones, tablets, and other handheld devices. The sustained forward and downward head positioning creates excessive strain on the cervical spine and surrounding soft tissues.
This isn't just about physical discomfort. Text neck affects how you feel about yourself. You become self-conscious about your appearance in photos. You feel frustrated that you can't hold your head up naturally. The constant neck pain makes it difficult to focus on work or enjoy activities with friends and family.
Current research indicates that text neck affects approximately 60% of smartphone users. Consider that the average person spends 3-5 hours daily looking down at their devices—that's over 1,000 hours per year of sustained stress on your neck and upper spine.
Here's the good news: Text neck is completely reversible with systematic correction. Your body adapted into this dysfunction through repeated positioning patterns, and it can adapt back to proper alignment through targeted corrective protocols.
The Biomechanics—How Text Neck Develops
Understanding the mechanical chain reaction behind text neck helps you recognize why targeted correction is necessary.
Your head weighs approximately 10-12 pounds when held in neutral position—ears aligned over shoulders. This is the weight your neck and upper spine are designed to support efficiently.
But here's where device use creates the problem: Every degree your head tilts forward dramatically increases the effective weight your neck must support.
Head Weight Progression:
- Neutral position (0°): 10-12 pounds
- 15° forward tilt: 27 pounds
- 30° forward tilt: 40 pounds
- 45° forward tilt: 49 pounds
- 60° forward tilt: 60 pounds
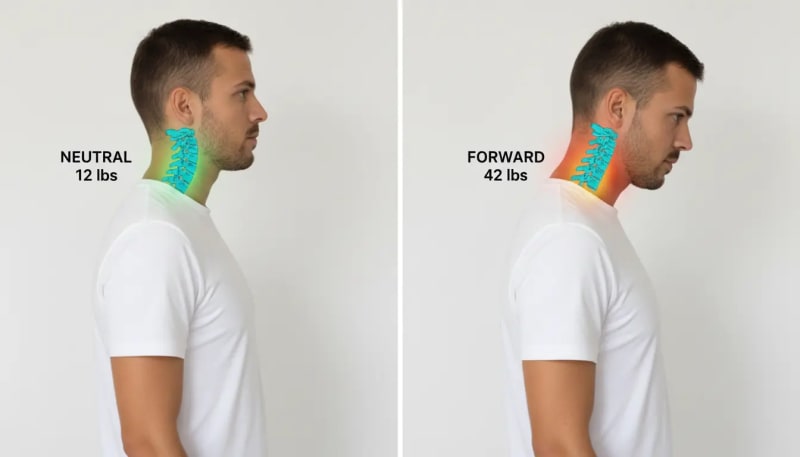
When you look down at your smartphone held at chest or lap level, your head typically tilts 45-60° forward. This means your neck is supporting 50-60 pounds instead of the 10-12 pounds it's designed to handle.
The Adaptation Process
Your body doesn't accept this dysfunction immediately. Text neck develops through progressive adaptation phases:
Initial Phase: Your neck muscles fatigue from holding the forward position during device use. You feel tired and achy after long screen sessions, but symptoms resolve with rest.
Adaptation Phase: Your body begins accepting the forward head position as "normal." The deep stabilizing muscles that should support your neck begin weakening from disuse. Meanwhile, the superficial muscles (sternocleidomastoid, upper trapezius) compensate by working overtime.
Structural Phase: Soft tissue changes become established. The chest muscles shorten from the rounded-forward shoulder position. The deep neck flexors continue weakening. Your nervous system fully accepts this dysfunction as your new baseline posture.
Chronic Phase: Complete dysfunction pattern. Your body cannot maintain neutral head positioning even when you consciously try. The forward head position becomes your default posture, present even when you're not using devices.
Here's the critical teaching point: The same body that adapted into dysfunction can adapt back to proper alignment. Systematic correction protocols leverage your body's natural adaptation mechanisms to restore optimal posture and eliminate text neck symptoms.
Self-Assessment: Do You Have Text Neck?
Before beginning any correction protocol, you need to establish your baseline. Two simple assessment methods help you determine if you have text neck and track your improvement over time.
The Wall Test Method
Stand approximately 6 inches from a wall with your heels touching the wall surface. Allow your body to settle into its natural resting posture—don't consciously pull your shoulders back or adjust your position.
Notice where your head naturally rests in relation to your shoulders:
✓ Normal Alignment (0-0.5 inches)
The back of your head touches or nearly touches the wall without effort. Your ear aligns directly over your shoulder.
⚠ Mild Text Neck (1-2 inches)
1-2 inches of space between your head and the wall. Noticeable forward head positioning. Likely experiencing occasional neck stiffness after extended device use.
⚠⚠ Moderate Text Neck (2-3 inches)
2-3 inches of space. Significant forward head posture visible to others. Consistent neck and upper back pain during and after device use.
🚨 Severe Text Neck (3+ inches)
3+ inches of space. Pronounced forward head positioning affecting overall appearance and causing persistent symptoms. Daily headaches and chronic neck tension.

Based on systematic reviews and cross-sectional studies (n=113-2,000 participants). Sources: PMC journals, Journal of Public Health, BMC Musculoskeletal Disorders, 2017-2024.
Even the general population shows 45% prevalence—text neck affects everyone who uses devices, not just desk workers.
That's nearly 1 in 2 people. If you use a smartphone, laptop, or tablet for more than 2 hours daily, you're at risk—regardless of your occupation.
Photo Comparison Assessment
Have someone take side-view photos of you standing in your natural posture. Don't pose or adjust your position—capture how you actually hold yourself throughout the day.
Mark two points on the photo: the center of your ear opening and the center of your shoulder. Draw a vertical line from your shoulder upward. In optimal posture, your ear should align with this vertical line. The horizontal distance between the line and your ear indicates the severity of forward head positioning.
Document these baseline photos. They provide visual proof of your starting point and allow you to track improvements as you implement corrective protocols.
Device-Related Symptom Checklist
Identify which symptoms you currently experience:
- Neck pain that worsens during or immediately after smartphone or tablet use
- Pain improves when you're away from screens and devices for extended periods
- Symptoms worsen progressively throughout your workday
- Headaches that correlate with extended device use sessions
- Upper back tension and shoulder tightness associated with phone use
- Visible forward head positioning evident in photos and reflections
The more symptoms you identify with, and the more frequently they occur, the more established your text neck pattern has become. This assessment helps you recognize the connection between your device habits and your physical dysfunction.
Complete Desk Ergonomics—The Foundation
Your workstation setup directly impacts text neck development and correction. Optimal desk ergonomics prevents worsening of existing dysfunction and creates the foundation for corrective exercises to work effectively.
Monitor Positioning
Position your monitor so the top third of the screen sits at eye level when you're seated in your natural upright posture. This allows a slight downward gaze angle of 10-20°—the optimal viewing position that minimizes neck strain.
Place the monitor at arm's length distance (approximately 20-26 inches from your eyes). Position it directly in front of you—no neck rotation should be necessary to view the screen. If you use dual monitors, arrange them in a slight arc so you can transition between screens with minimal head movement.
Chair Configuration
Adjust your chair height so your feet rest flat on the floor (or on a footrest if needed). Your knees should form a 90° angle with your thighs parallel to the floor.
Set the lumbar support to maintain the natural inward curve of your lower back. This spinal support prevents the slouched positioning that contributes to forward head posture. If your chair lacks adequate lumbar support, use a small cushion or rolled towel positioned at the small of your back.
Adjust armrests (if present) to support your forearms without forcing your shoulders to elevate. Your upper arms should hang naturally from your shoulders with elbows at approximately 90°.

Optimal workstation setup prevents text neck progression—monitor at eye level 20-26 inches away, chair supporting lower back, elbows and knees at 90-degree angles, feet flat on floor
Keyboard and Mouse Placement
Position your keyboard 4-6 inches from the edge of your desk. This distance allows your forearms to rest on the desk surface while typing, reducing shoulder and neck tension.
Keep your keyboard flat or use a negative tilt (back edge lower than front). This promotes neutral wrist positioning and prevents the hunched-forward posture that exacerbates text neck.
Place your mouse at the same height as your keyboard, close enough that you can use it without reaching. Your wrist should remain neutral—not bent upward or downward—during mouse use.
Lighting Considerations
Reduce screen glare by positioning your monitor perpendicular to windows. Ensure adequate ambient lighting—working in dim conditions causes you to lean forward toward the screen, worsening text neck positioning.
If you experience eye strain, adjust your monitor brightness to match surrounding light levels and consider using a desk lamp to provide task lighting without creating screen glare.
Complete Smartphone Protocols
Smartphone positioning is the primary driver of text neck development. Modifying your device habits prevents progression and supports correction of existing dysfunction.
Phone Positioning Fundamentals
The cardinal rule: Bring your phone to eye level rather than lowering your head to the phone. This single principle prevents the 45-60° forward head tilt that creates text neck.
Hold your phone at chest height minimum during all use. Use both hands to elevate the device—this distributes the holding effort and makes it easier to maintain proper positioning for extended periods.
Avoid one-handed phone use below chest level. The single-hand grip forces you into the classic text neck position: head forward, shoulders rounded, neck flexed. Break this habit by committing to two-handed elevated positioning.

The 20-20-20 Rule
Implement the 20-20-20 protocol during extended phone sessions: Every 20 minutes, look at something 20 feet away for 20 seconds.
This simple practice serves multiple purposes. It resets eye strain from close-focus screen viewing. It breaks the sustained forward head positioning pattern. It reminds you to check your posture and readjust to neutral alignment.
Walking and Phone Use
Never walk while looking down at your phone. This behavior combines text neck positioning with reduced situational awareness—you're training dysfunction while risking accidents.
If you need to check your phone while moving, stop walking completely. Bring the phone to eye level, complete your task, then resume walking. Alternatively, use hands-free voice features that allow you to interact with your device while maintaining upright head positioning and awareness of your surroundings.
Seated Phone Use
When using your phone while seated, prop your elbows on a table or armrests to support the phone at elevated height. This reduces arm fatigue and makes it easier to maintain proper positioning during longer phone sessions.
Consider using a phone stand or holder that positions the device at eye level on your desk. This completely eliminates the need to hold the phone and allows you to maintain optimal posture during extended video calls or content consumption.
Avoid the lap-level phone position that's common during breaks or casual use. This is precisely the positioning that creates and reinforces text neck dysfunction. Maintain the upright spine and elevated device principle in all scenarios.
WHY ERGONOMIC CHANGES ALONE WON'T FIX YOUR TEXT NECK
Perfect desk setup and phone positioning prevent text neck from getting worse. These modifications are essential for long-term success.
But here's the reality: If you already have text neck pain and forward head positioning, changing your environment won't eliminate it.
Environmental optimization = prevention. Exercise protocols = correction.
Your body has adapted to dysfunction. The deep neck stabilizers have weakened, the chest muscles have shortened, and your nervous system has accepted this forward position as "normal."
You need targeted corrective exercises to reverse these existing adaptations.
Three Corrective Exercises for Text Neck
The following three exercises target the specific dysfunction patterns created by text neck. Each exercise addresses a distinct component of the problem: suboccipital tension, chest muscle shortening, and neck-shoulder connection tightness.
Exercise 1: Deep Neck Release
Release tension from looking down at devices
What It Does
Releases suboccipital tension accumulated from hours of downward device gazing. This exercise decompresses the area where your skull meets your neck—the primary stress point in text neck. The sustained pressure allows chronically tight muscles to release and restore normal mobility to the upper cervical region.
Equipment
Two tennis balls or lacrosse balls
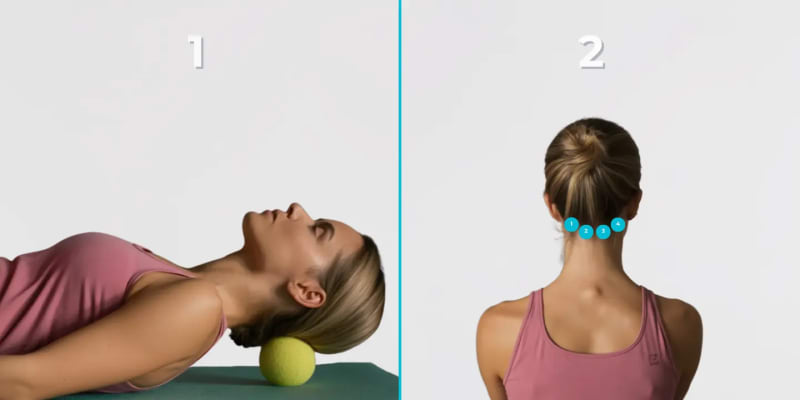
Instructions
- Lie on your back on a flat surface (floor, yoga mat, or firm bed)
- Place the tennis balls at the base of your skull where it meets your neck (the bony ridge you feel at the back of your head)
- Let your head weight rest completely on the balls—resist the urge to actively push or press
- Find the tender spots by making small nodding movements of your head
- Once you locate a tender area, hold that position for 60-90 seconds
- Breathe deeply and slowly, consciously allowing the muscles to soften and release
- Move the balls slightly (about half an inch) to target adjacent tender areas
Frequency
Perform once daily, preferably in the evening after your day's device use. This timing allows you to release accumulated tension before sleep.
Form Cues
- Let gravity do the work—don't actively push your head into the balls
- Stay on tender points, not painful points (discomfort is acceptable, sharp pain is not)
- Deep breathing enhances the release effect
- You may feel relief and loosening during the session itself
Common Mistakes
- Pushing too hard—the pressure should be gentle and sustainable
- Positioning the balls too low on your neck instead of at the skull base
- Tensing your neck muscles instead of consciously relaxing them
- Holding your breath—breathing is essential for muscle release
Exercise 2: Chest Opener
Reverse device-rounded shoulders
What It Does
Opens chest muscles shortened from phone-forward posture. This exercise specifically releases tightness in the pectoralis minor and major muscles that pull your shoulders forward during device use. Restoring chest flexibility allows your shoulders to naturally settle back into proper alignment, which directly supports correct head positioning.
Equipment
Doorway or corner wall
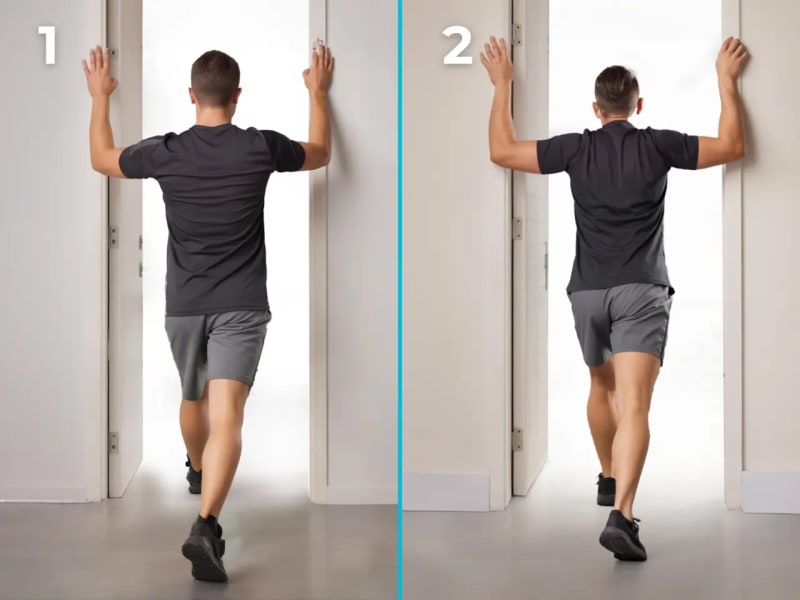
Instructions
- Stand in a doorway with your feet positioned shoulder-width apart
- Place both forearms on the door frame with your elbows bent at 90° angles
- Step forward with one foot until you feel a distinct stretch across your chest
- Maintain a neutral spine position—avoid arching your lower back
- Hold the stretch for 45-60 seconds while breathing deeply
- Focus on feeling the stretch deepen slightly with each exhale
- Step back, rest briefly, then repeat for a total of 3 sets
Variations
Adjust arm height to target different areas of the chest:
- Higher arm position: Targets upper chest and anterior shoulder region
- Lower arm position: Targets lower chest fibers
- Alternate heights: Perform sets at different heights for complete chest opening
Frequency
Twice daily—once in the morning to establish open posture for the day, and again after extended device use sessions in the evening.
Form Cues
- Feel the stretch across the front of your shoulders and chest
- Keep your core engaged to prevent collapsing forward through your lower back
- Your shoulders should stay down and away from your ears (not hunched upward)
- The stretch should feel releasing, not painful
Expected Results
Progressive opening of your chest, easier maintenance of upright posture throughout the day, and reduced tendency toward shoulder rounding during device use.
Exercise 3: Neck-Shoulder Release
Release phone-shoulder connection tension
What It Does
Releases levator scapulae and upper trapezius tension that develops from holding phone positions. This exercise targets the diagonal muscle that connects your neck to your shoulder blade—the exact area that becomes chronically tight from one-handed phone use and sustained elevated arm positions while texting.
Equipment
Your hands (no additional equipment needed)

Instructions
- Sit upright with proper posture (shoulders back, spine neutral)
- Tilt your head 45° toward your right side—this diagonal angle is crucial (not straight to the side)
- Place your left hand on your left collarbone to anchor your shoulder in place
- Apply gentle downward pressure to keep that shoulder from elevating
- Use your right hand positioned behind your head to provide very gentle assistance to the stretch
- Hold this position for 30-45 seconds, breathing normally throughout
- Release slowly, then repeat on the opposite side
- Perform 2 complete sets on each side
Frequency
2-3 times daily, especially immediately following extended phone use sessions. This exercise is particularly effective when performed during work breaks after texting or scrolling sessions.
Form Cues
- The 45° diagonal angle is essential—not straight to the side
- You should feel the stretch along the back-diagonal portion of your neck
- Very gentle head assistance only (the shoulder anchor creates most of the stretch)
- Breathe normally throughout—avoid holding your breath
- The stretch should feel releasing, like tension melting away
Common Mistakes
- Pulling the head too aggressively with the assisting hand
- Wrong angle—tilting straight to the side instead of diagonally forward
- Not adequately anchoring the shoulder, allowing it to elevate during the stretch
- Holding breath or tensing other muscles
Device-Specific Benefit
This exact tension pattern develops from one-handed phone scrolling and texting positions. The levator scapulae works overtime trying to stabilize your shoulder while your arm is elevated to hold the phone. Regular performance of this stretch directly counteracts that specific dysfunction pattern.
WHY THESE THREE EXERCISES ALONE WON'T FIX YOUR TEXT NECK
These exercises will provide:
✓ Immediate relief from device-related neck tension
✓ Beginning stages of the correction process by restoring basic mobility
✓ With consistent daily practice, temporary symptom relief
But they will NOT:
✗ Achieve complete permanent correction on their own
The Missing Components:
These foundational exercises address surface-level tension. Complete text neck correction requires progressive strengthening protocols, deep stabilizer activation, postural retraining, and systematic phase progression.
Most people plateau at partial improvement using basic exercises alone. Complete correction requires systematic progression through all corrective phases.
For complete, permanent correction eliminating text neck dysfunction, you need a comprehensive systematic protocol.
Ready to Eliminate Text Neck Permanently?
The three exercises above provide temporary relief and begin the correction process. For complete, permanent results, you need a structured systematic approach that addresses all corrective components.
The BaseHealthBlueprint Posture Reset Blueprint includes the complete protocol specifically designed for text neck and forward head posture dysfunction. Systematic progression through all phases produces lasting correction.
See the Complete Solution Now →When to See a Healthcare Professional
While text neck typically responds well to self-correction protocols, certain symptoms require professional medical evaluation.
Red Flags Requiring Evaluation:
- Numbness or tingling sensations radiating into your arms or hands
- Pain that extends past your elbows into your forearms
- Weakness in your arms, hands, or grip strength
- Difficulty performing fine motor tasks like buttoning shirts or typing
- Progressive worsening of symptoms despite consistent intervention
- Recent trauma, accident, or injury to your neck or upper back
- Severe headaches accompanied by vision changes or dizziness
Appropriate for Self-Correction:
- Chronic neck pain specifically associated with device use
- Visible forward head posture without neurological symptoms
- Tension headaches occurring two or more times weekly
- Pain that improves when you change positions or take breaks from screens
- No numbness, tingling, or weakness in your extremities
- Gradual onset related to lifestyle factors (not traumatic injury)
Important Note: These corrective exercises complement professional care—they don't replace medical evaluation when red flag symptoms are present. If you're unsure whether your symptoms require professional assessment, err on the side of caution and consult a healthcare provider.