Look at the above photo. What do you see?
Most people say: "Normal posture. Maybe slightly casual, but nothing wrong."
That's exactly the problem.
Forward head posture is so common—affecting 66% of adults—that it's become our new "normal." We see it everywhere: coworkers, family members, strangers on the street. Even when you look in the mirror, your brain has recalibrated to accept this position as correct.
But here's what's actually happening:
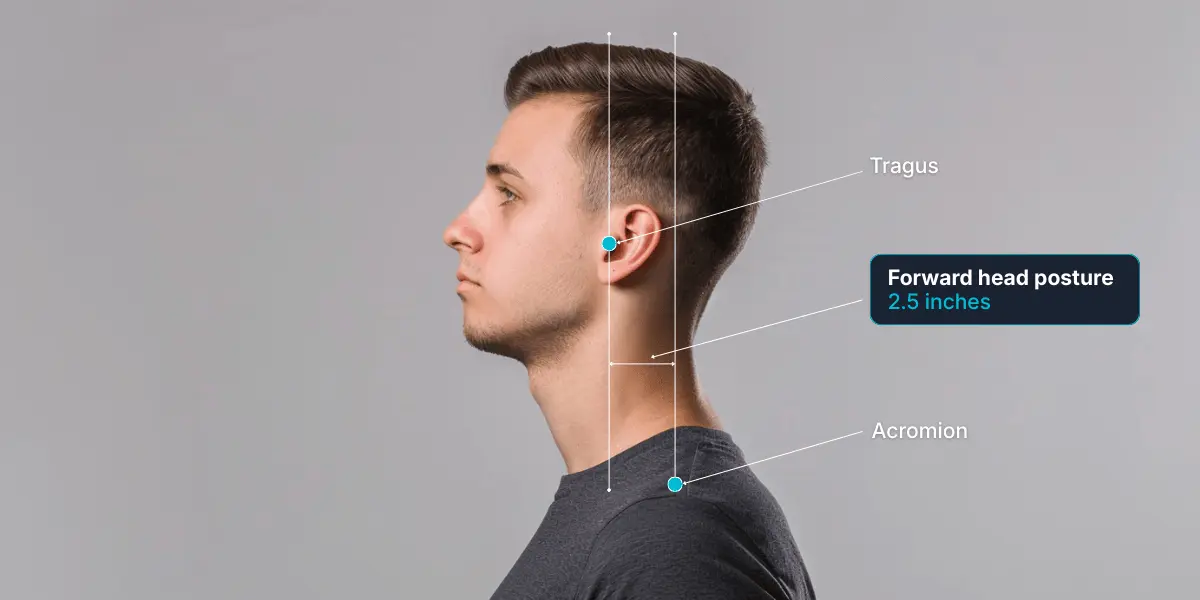
Forward head posture is measured by the horizontal distance between your ear (tragus) and shoulder point (acromion).
This person has moderate forward head posture. His ear (tragus) sits 2.5 inches forward of his shoulder (acromion)—meaning his neck supports approximately 35 pounds instead of the normal 12 pounds.
He's been walking around like this for years without realizing it. And he's not alone.
The Forward Head Posture Epidemic
Forward head posture develops so gradually that your nervous system accepts it as "neutral." What feels straight to you may actually be 2-3 inches forward. This creates three critical blind spots:
- Proprioceptive Drift: Your brain's positional awareness system recalibrates to accept the dysfunction as normal
- Visual Habituation: You see yourself daily, making gradual changes invisible
- Compensatory Masking: Your body develops workarounds that hide the true extent of misalignment
Why This Matters
For every inch your head moves forward, you add approximately 10 pounds of load to your neck and upper spine. At 2.5 inches forward:
- Your neck supports 35 pounds instead of 12 pounds
- Equivalent to carrying a bowling ball on your neck all day
- Creates chronic muscle strain and spinal compression
- Leads to headaches, jaw pain, reduced breathing capacity
Sound familiar?
If you've been told to "sit up straight" or "improve your posture" without seeing lasting results, it's because forward head posture requires systematic correction—not just conscious awareness.
The Self-Assessment Paradox
In our assessment of 9,000+ participants, 78% underestimated their forward head displacement by at least 1 inch. Your perception of "straight" is likely already compromised by years of gradual adaptation.
This is why objective measurement—not how you "feel"—is essential for tracking correction progress.
What Is Forward Head Posture?
Forward head posture is a specific biomechanical condition where your head habitually sits forward of its optimal position stacked directly above your shoulders. This isn't just poor posture—it's a neuromuscular adaptation pattern involving muscle weakness, tissue shortening, and altered movement patterns.
The statistics reveal the scope: Studies show that 66% of office workers have measurable forward head posture, with average displacement of 2.5 inches. That displacement means the average desk worker's neck supports 40 pounds of load instead of the normal 12-15 pounds.
Forward head posture creates a cascade of problems: chronic tension headaches, jaw dysfunction (TMJ), reduced breathing capacity, premature spinal degeneration, visible facial aging from altered muscle patterns, and neck pain that interferes with daily activities.
What makes FHP different from general "bad posture" is that it's not about being lazy or slouching. FHP is a neuromuscular adaptation involving specific muscle weakness (deep neck flexors), fascial shortening (chest and front neck), and altered brain mapping (your nervous system accepts this position as "normal"). It requires targeted corrective intervention, not just "sit up straight" reminders that last five minutes.
The good news: Forward head posture is fully correctable at any age, regardless of how long you've had it. Mild cases (1 inch forward) typically correct in 3-4 weeks with consistent protocol. Moderate cases (2 inches) need 5-6 weeks. Severe cases (3+ inches) require 6-8 weeks of systematic correction.
This guide provides the complete assessment protocol and foundational correction exercises to begin reversing forward head posture.
The Biomechanics: How Forward Head Posture Develops
Forward head posture isn't random—it's a predictable cascade of muscular and postural changes that develop in response to sustained positions and repetitive movements.
Initial Adaptation
Muscle Compensation Begins
Your posterior neck muscles—upper trapezius, levator scapulae, and suboccipitals—contract constantly to prevent your head from falling further forward. These stabilizer muscles aren't designed for sustained work. They develop chronic tension, trigger points, and eventually weakness from overwork. This stage is the easiest to correct.
Tissue Adaptation
Physical Shortening Occurs
Your chest muscles (pectoralis major and minor) and front neck muscles (sternocleidomastoid, scalenes) physically shorten. The fascia—connective tissue throughout your body—remodels to support this position. Meanwhile, your deep cervical flexors weaken from disuse. Correction now requires tissue lengthening, not just postural awareness.
Neurological Acceptance
Brain Recalibrates Normal
Your nervous system accepts forward head posture as your new 'normal.' Proprioceptive sensors throughout your neck recalibrate, so correct posture now feels wrong and uncomfortable. Your brain has literally reprogrammed what neutral feels like. Correction requires neurological retraining alongside physical work.
Structural Changes
Spinal Adaptation Begins
Your cervical vertebrae and intervertebral discs begin adapting to chronic forward positioning. Joint surfaces may develop wear patterns, and disc spaces can become compressed. These structural changes require the most comprehensive intervention—combining tissue work, strengthening, and neurological retraining over extended periods.
Why This Matters for Correction
Understanding these stages explains why correction requires systematic progression. You can't just "stand up straight" because your tissues have physically adapted to forward posture. Effective correction must:
- Release shortened tissues (chest, front neck)
- Strengthen weakened stabilizers (deep cervical flexors)
- Retrain movement patterns and neurological positioning
- Progress through phases as tissues remodel
This process takes 6-12 weeks, but it works systematically when done correctly.
The Wall Test: Measure Your Forward Head Posture
The wall test provides an objective, measurable assessment of your forward head posture. This measurement allows you to track correction progress over time and determine correction timeline.
How to Perform the Wall Test
Setup:
- Find a flat wall with nothing hanging on it
- Wear form-fitting clothing (easier to see alignment)
- Remove shoes (socks are fine)
- Have someone help measure or take a photo from the side
Test Procedure:
- Stand with your heels 6 inches from the wall
- Allow your natural, everyday posture to emerge (don't force corrections)
- Let your buttocks touch the wall naturally
- Let your shoulder blades touch the wall naturally
- Keep your normal head position (resist the urge to pull it back)
- Breathe normally and relax into your typical posture
Measurement:
- Have helper hold a ruler horizontally against the wall
- Measure the horizontal distance from the wall to the back of your head
- The measurement point is where your skull is most prominent (occipital bone)
- Record this measurement in inches
Severity Grading
✓ Normal (0-0.5 inches)
Your head is within acceptable range of neutral alignment. Minor refinement may still be beneficial, but no urgent correction needed.
⚠ Mild FHP (0.5-1.5 inches)
Early-stage forward head posture. Likely experiencing occasional tension headaches, mild neck stiffness after extended computer work, minor range of motion limitations. Correctable in 3-4 weeks with consistent protocol.
⚠⚠ Moderate FHP (1.5-2.5 inches)
Established forward head posture with tissue adaptations. Experiencing frequent tension headaches, consistent neck and upper back pain, noticeable postural changes in photos, reduced cervical range of motion. Correctable in 5-6 weeks with systematic approach.
🚨 Severe FHP (2.5+ inches)
Advanced forward head posture with significant tissue and possible structural changes. Chronic daily symptoms, visible postural changes, restricted cervical mobility, possible TMJ involvement, breathing limitations. Correctable in 6-8 weeks with comprehensive protocol, possible benefit from physical therapy consultation.
Environmental Modifications for Forward Head Posture
While complete correction requires targeted exercises (covered below), environmental modifications prevent FHP from worsening and support the correction process. These changes address the positions and activities that created forward head posture originally.
Reading Position Optimization
Forward head posture commonly develops from prolonged reading with poor positioning. Books, tablets, and phones positioned too low force your head forward and down.
Optimal Reading Setup:
- Reading material at eye level (15-20 degree downward gaze maximum)
- Book stands or tablet holders that elevate material to proper height
- For paperback books: hold book up rather than looking down
- E-readers: prop at 45-60 degree angle on surface or use stand
- Avoid reading in bed with head propped forward on pillows
Duration Management:
Even optimal positioning requires breaks. Set timer for 25-minute intervals. After each interval, spend 60 seconds looking at distant objects (15+ feet away) to reset eye focus and neck position.
TV and Screen Viewing Setup
Television positioned too low or too high both contribute to poor neck alignment.
Optimal TV Viewing:
- Center of screen at eye level when seated in normal viewing position
- Viewing distance: 1.5-2.5x screen diagonal (55" TV = 7-11 feet away)
- Couch or chair provides proper lumbar support
- Avoid extended periods on low couches or beds with head propped on pillows
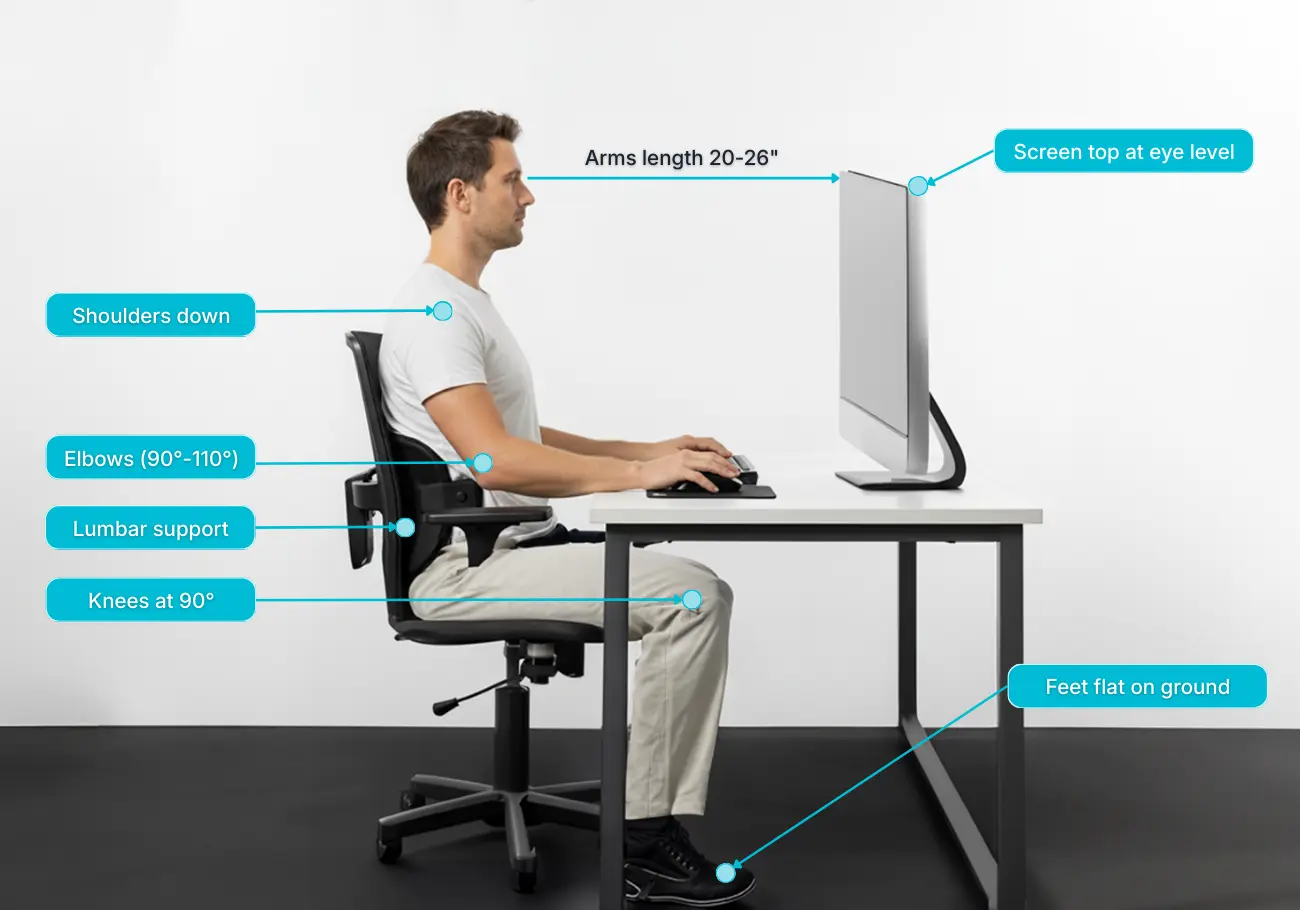
Computer Screen Guidelines:
- Monitor top edge at or slightly below eye level
- 20-26 inch distance from eyes to screen
- Screen directly in front (not off to side)
WHY ENVIRONMENTAL CHANGES ALONE WON'T FIX YOUR FORWARD HEAD POSTURE
Optimal reading positions, screen height adjustments, and viewing angle modifications stop forward head posture from getting worse. These modifications are non-negotiable for long-term success.
But here's the reality: If you already have measurable forward head posture, environmental changes won't eliminate it.
Environmental optimization = prevention. Exercise protocols = correction.
Your body has adapted to dysfunction. The deep cervical flexors have weakened, the chest muscles have shortened, the posterior neck muscles are chronically tight, and your nervous system has accepted forward head position as "normal."
These tissue adaptations don't reverse from better ergonomics alone. You need targeted corrective exercises to reverse the existing muscular imbalances and retrain proper positioning.
Three Corrective Exercises for Forward Head Posture
These three exercises target the specific muscular imbalances that create and maintain forward head posture. Perform them daily in the sequence provided for optimal correction.
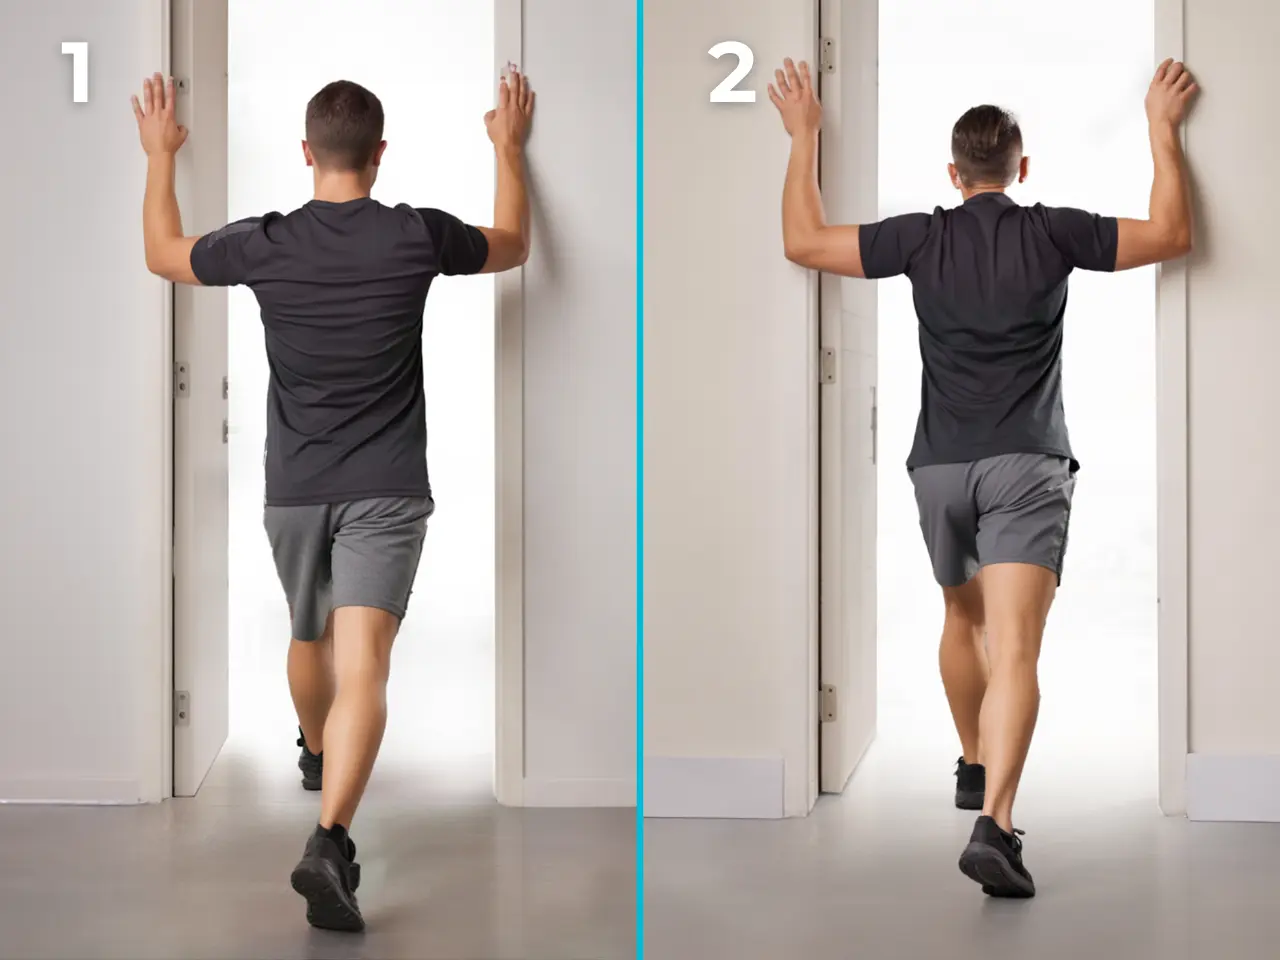
Exercise 1: Chest Opener (Doorway Stretch)
Why Critical for FHP:
Forward head posture always involves shoulder rounding. Your chest muscles adapt by shortening, pulling shoulders forward and reinforcing the forward head position. Until chest opens, shoulders can't return to neutral, making head correction impossible.
Equipment: Doorway or corner
Instructions:
- Stand facing an open doorway
- Position forearms on doorframe at shoulder level
- Keep elbows at 90-degree angles
- Take a step forward with one foot
- Lean gently forward until you feel chest stretching
- Maintain neutral spine (avoid excessive lower back arch)
- Hold stretch for 60 seconds
- Return to start, switch feet, repeat for 3 sets
Frequency: Twice daily (morning and evening), three sets each session
Form Cues:
- Stretch should be felt across chest and front of shoulders
- Elbows stay at 90 degrees throughout
- Core engaged to prevent lower back arching
- Breathe deeply into the stretch
- No pain in shoulders or neck—only stretch sensation
Common Mistakes:
- Arching lower back excessively (engage core)
- Letting elbows drift below or above 90 degrees
- Stepping too far through doorway (moderate stretch is enough)
- Holding breath (breathe normally)
Exercise 2: Shoulder Tension Release
Release upper trapezius and levator scapulae tension
What It Does:
Releases chronic tension in the upper trapezius and levator scapulae muscles that develop from holding forward head posture. These muscles work overtime to prevent your head from falling further forward, creating persistent tightness from the base of your skull down to your shoulder blade.
Equipment: Your hands (no additional equipment needed)
Instructions:
- Sit upright with your right hand behind your back to anchor the shoulder
- Tilt your head toward your left shoulder (ear moving toward shoulder, not forward or back)
- Place your left hand on the right side of your head
- Apply gentle downward pressure to deepen the stretch
- Hold for 30 seconds, breathing normally throughout
- Release slowly, return to center, and repeat on the opposite side
- Perform 2 complete sets on each side
Frequency: 2-3 times daily. Particularly effective after prolonged desk work or phone use when upper trap tension accumulates.
Form Cues:
- Keep shoulders down and relaxed—don't shrug during the stretch
- Tilt head directly sideways only (ear to shoulder, not rotating)
- Let gravity do most of the work—hand provides only light assistance
- Feel the stretch from your ear down the side of your neck to your shoulder
- Breathe normally—don't hold your breath
Common Mistakes:
- ⚠️ Lifting the shoulder up—keep it down and anchored
- ⚠️ Rotating the head—tilt sideways only, no twisting
- ⚠️ Applying too much hand pressure—gentle assistance only

Exercise 3: Front Neck Release
Release sternocleidomastoid (SCM) tightness
What It Does:
Releases the sternocleidomastoid muscles along the front sides of your neck that shorten from sustained forward head positioning. These prominent neck muscles become chronically tight in FHP, contributing to the forward pull of your head and limiting your ability to achieve neutral positioning.
Equipment: Your hands (no additional equipment needed)
Instructions:
- Sit or stand with upright posture
- Turn your head to look over your right shoulder
- Place your left hand on your left shoulder to anchor it in place
- Tilt your head back slightly and look up toward the ceiling
- Hold for 30 seconds, feeling the stretch along the front-side of your neck
- Return to center, then repeat on the opposite side
- Perform 2 complete sets on each side
Frequency: 2-3 times daily. This exercise is particularly effective before performing the deep cervical flexor strengthening, as it prepares the anterior neck structures for proper activation.
Form Cues:
- Feel the stretch along the front-side of your neck from collarbone to jaw
- Keep your jaw relaxed—don't clench or grind your teeth
- Hand on shoulder anchors the stretch and increases its effectiveness
- The tilt back should be gentle, not extreme
- Breathe normally throughout the hold
Common Mistakes:
- ⚠️ Tilting back too far—the stretch should be gentle, not extreme
- ⚠️ Tensing the jaw—keep it completely relaxed throughout
- ⚠️ Forgetting to turn head first—always turn before tilting back

WHY THESE THREE EXERCISES ALONE WON'T FULLY CORRECT YOUR FHP
These exercises will provide:
✓ Immediate relief from chronic neck and shoulder tension
✓ Begin the correction process by addressing primary imbalances
✗ Will NOT achieve 60-90% complete permanent correction on their own
The Missing Components:
These foundational exercises address tissue tightness and basic mobility. Complete forward head posture correction requires progressive strengthening protocols for deep cervical flexors, scapular stabilizer activation, postural retraining against resistance, and systematic phase progression through all corrective stages.
Most people plateau at 40-50% improvement using basic exercises alone. The remaining correction requires systematic progression through strengthening, stabilization, and integration phases.
For complete permanent correction bringing your head back to neutral alignment, you need a comprehensive systematic protocol.
Ready to Eliminate Forward Head Posture Permanently?
The three exercises above provide foundational correction and address primary muscular imbalances. For complete, permanent results bringing your head back to optimal neutral alignment, you need a structured systematic approach progressing through all corrective phases.
The BaseHealthBlueprint Posture Reset Blueprint includes the complete protocol specifically designed for forward head posture, text neck, and related cervical dysfunctions. The systematic 8-week progression produces lasting structural correction.
See the Complete Solution Now →When to Consult a Healthcare Provider
Most forward head posture cases respond well to systematic self-correction. However, certain symptoms warrant professional evaluation before beginning any exercise program:
Seek Professional Evaluation If You Experience:
- Sharp, stabbing pain (not dull ache or tension)
- Radiating pain, numbness, or tingling down arms or into hands
- Weakness in arms or hands (difficulty gripping, carrying objects)
- Dizziness, vertigo, or balance problems
- Visual changes or blurred vision
- Difficulty swallowing or breathing
- Headaches accompanied by fever, confusion, or vision changes
- Progressive worsening despite consistent corrective efforts
- Recent trauma or injury to neck or head
Professional Resources:
Physical therapists specializing in orthopedics or manual therapy can provide hands-on treatment, advanced assessments, and individualized progression. Chiropractors trained in evidence-based rehabilitation can offer spinal manipulation and corrective exercise programming.
For most people with uncomplicated forward head posture from desk work and screen use, consistent self-correction produces excellent results. Professional intervention accelerates progress in complex cases.