You've noticed it in the mirror—a visible bump at the base of your neck where it meets your upper back. Maybe someone pointed it out, or you caught yourself in a side-profile photo. That rounded protrusion at the top of your spine is called dowager's hump (cervicothoracic kyphosis), and it's far more common than you think.
What Is Dowager's Hump?
Dowager's hump appears as a pronounced curve or hump at the junction where your neck meets your upper back—specifically at the C7-T1 vertebrae (seventh cervical to first thoracic vertebra). While the term "dowager's hump" originated from observing elderly women with severe postural changes, this condition now affects people of all ages, genders, and activity levels.
The modern epidemic: Desk workers, smartphone users, and anyone spending extended time in forward-head positions are developing visible humps decades earlier than previous generations. Studies show that 60% of office workers exhibit some degree of upper thoracic kyphosis by age 40.
What You're Seeing
The visible bump results from three overlapping factors:
- Structural adaptation: Your thoracic spine (upper back) has curved forward beyond its natural kyphotic curve, creating excessive rounding
- Muscle compensation: Muscles at the neck-shoulder junction have become chronically tight and thickened from holding your head in a forward position
- Fat accumulation: The stressed junction point where your neck meets your back accumulates subcutaneous fat tissue as a protective response
It's not just cosmetic. While the visible hump causes self-consciousness and affects clothing fit, the underlying postural dysfunction creates chronic upper back stiffness, reduced neck mobility, tension headaches, and shallow breathing patterns.
The good news: Dowager's hump responds to systematic correction. With targeted exercises, environmental modifications, and consistent application of the right protocols, most people achieve 60-90% reduction in hump visibility within 8-12 weeks.
Why Dowager's Hump Develops: The Biomechanics
The postural cascade:
Dowager's hump doesn't appear overnight. It develops through a predictable sequence of postural compensations that reinforce each other over months and years.
Forward Head Posture Initiates the Problem
Your head weighs approximately 12 pounds in neutral alignment. When your head shifts forward even 1-2 inches (common with desk work and smartphone use), the effective weight on your cervicothoracic junction increases to 20-30 pounds. This excessive load forces your upper thoracic spine to round forward to support the cantilevered head position.
Thoracic Kyphosis Increases
As your upper back rounds forward to accommodate the forward head, your thoracic spine exceeds its natural 20-40 degree kyphotic curve, often reaching 50-70 degrees. This excessive curvature creates a visible hump at the C7-T1 junction.
Muscular Adaptations Occur
Your body adapts to maintain this position:
- Upper trapezius and levator scapulae (back of neck/shoulder muscles) become chronically tight and overdeveloped from working overtime to support your forward head
- Deep neck flexors (front neck stabilizers) become weak and inhibited
- Lower trapezius and rhomboids (mid-back muscles) become overstretched and weak
- Pectoralis major and minor (chest muscles) shorten from the rounded-forward shoulder position
Structural Changes Solidify
Over 6-12 months of sustained poor posture:
- Spinal ligaments adapt to the curved position, losing their ability to pull you back to neutral
- Intervertebral discs compress on the front side and expand on the back side
- The facet joints in your upper thoracic spine become stiff in the flexed position
- Subcutaneous fat accumulates at the stressed C7-T1 junction
The Vicious Cycle
The rounded upper back pulls your head further forward → increased load on the cervicothoracic junction → more rounding → more fat accumulation → larger visible hump.
Why It Persists
Once established, dowager's hump doesn't resolve on its own because:
- 1 Your body has physically adapted to the curved position
- 2 The muscles holding you in that position are now stronger than the muscles that could pull you upright
- 3 Your nervous system has recalibrated to recognize the curved position as "normal"
- 4 Environmental factors (desk height, sleep position, driving posture) continuously reinforce the pattern
Breaking this cycle requires targeted intervention addressing all four factors: structural mobility, muscular balance, neuromuscular reprogramming, and environmental optimization.
How to Assess Your Dowager's Hump Severity
Side-Profile Photo Test
- Have someone take a side-profile photo of you standing naturally
- Look for the angle of your upper back at the base of your neck
- Assess visibility and prominence of the hump
Severity Staging
⚠ Mild (Stage 1)
- Slight rounding visible in side profile
- Bump barely noticeable in clothing
- Minimal restriction in neck extension (looking up)
⚠⚠ Moderate (Stage 2)
- Clearly visible hump in side profile
- Noticeable through most clothing
- Moderate restriction in neck extension
- Upper back feels chronically stiff
🚨 Severe (Stage 3)
- Pronounced protrusion visible from multiple angles
- Visible through all clothing
- Significant restriction in neck and upper back movement
- May include chronic tension headaches and breathing restrictions
Wall Test (Alternative Method)
- Stand with your back against a wall, heels 6 inches from wall
- Press your buttocks and shoulder blades against wall
- Attempt to touch the back of your head to the wall
Results
- ✓ Head touches wall easily = Minimal to no dowager's hump
- ✓ Head 1-2 inches from wall = Mild to moderate
- ✓ Head 3+ inches from wall = Moderate to severe
Document Your Baseline
Take dated side-profile photos now and every 2 weeks during correction. This objective tracking prevents the "gradual adaptation blindness" where you don't notice your own improvement because you see yourself daily.
Environmental Modifications That Matter for Dowager's Hump
Before implementing corrective exercises, environmental modifications are essential. These changes prevent dowager's hump from worsening and create the foundation for correction.
Sleep Position Optimization (CRITICAL for Dowager's Hump)
The Problem
Sleeping with stacked pillows keeps your neck and upper back in flexion for 7-8 hours nightly—directly reinforcing the dowager's hump position even during what should be recovery time. This is the #1 overlooked cause of persistent dowager's hump despite proper daytime posture.
Best: Back Sleeping
- Supports natural cervical curve
- Pillow height: 2-3 inches ONLY (one thin pillow)
- Small pillow under knees to reduce low back stress
- Your head should be neutral, not pushed forward
Acceptable: Side Sleeping
- Keep head neutral (not flexed forward)
- Pillow height: 4-5 inches to fill gap between shoulder and head
- Pillow between knees
- Ensure pillow isn't too high (head shouldn't tilt up)
Worst: Stomach Sleeping
- Forces neck rotation and extension
- Absolutely avoid during correction phase
- Promotes forward head posture
Critical Rule
ONE properly-sized pillow ONLY. Multiple stacked pillows keep your upper back rounded and head forward all night, undoing your daytime correction efforts.
Pillow Selection
- Memory foam or cervical pillow maintaining proper height
- Avoid overly thick pillows that push head forward
- Replace pillows that have compressed down over time
Transition Strategy (if you're a stomach sleeper)
- Week 1-2: Side sleep with body pillow
- Week 3-4: Alternate between side and back
- Week 5+: Primarily back sleeping
Most people adapt to new sleep positions within 2-3 weeks. Initial discomfort is normal as your body adjusts to proper alignment.

Driving Posture (Often Ignored)
Why it matters for dowager's hump: Car seats often promote slumped posture, especially in older vehicles without proper lumbar support. Long commutes (1+ hour daily) compound the upper back rounding that creates and maintains dowager's hump.
Optimal Driving Setup
Lumbar Support:
- Position lumbar support at natural lower back curve
- Add cushion if your car seat lacks adequate support
- Should maintain slight inward curve in lower back
Headrest Position:
- Headrest should touch back of head (NOT base of neck)
- Middle of headrest at ear level
- This prevents forward head creep during long drives
Seat Angle:
- Slight recline (100-110 degrees, not 90 degrees straight up)
- Too upright increases upper back strain
- Too reclined promotes forward head compensation
Steering Wheel Height:
- Adjusted so shoulders stay down and back
- Arms slightly bent at elbows
- Avoid reaching forward (brings shoulders into protraction)
Mirror Awareness Trick
Adjust your rearview mirror for perfect upright posture. If you have to slouch to see the mirror clearly, your posture has collapsed. This creates immediate postural feedback during every drive.
The 8-Hour Reality
If you do perfect exercises for 20 minutes daily but then sleep with 3 stacked pillows for 8 hours and drive 90 minutes daily in a slumped position, you will not see results.
The environment wins.
Your correction protocol must include both active exercises AND passive environmental optimization. Sleep position and driving posture corrections are non-negotiable for lasting results.
Brief workspace mention: Proper desk ergonomics matter (monitor at eye level, chair with lumbar support), but sleep position and driving posture have the greatest impact on dowager's hump specifically because they involve prolonged static positioning of the cervicothoracic junction.
WHY ENVIRONMENTAL CHANGES ALONE WON'T FIX YOUR HUMP
Sleep position, desk setup, and driving posture stop dowager's hump from getting worse. These modifications are non-negotiable for long-term success.
But here's the reality: If you already have a visible hump, changing your environment won't make it disappear.
Environmental optimization = prevention. Exercise protocols = correction.
Your upper back has physically adapted to the curved position. The muscles holding you in that posture are shortened and tight. The muscles that should pull you upright are weak and inhibited. Fat tissue has accumulated at the stressed junction point.
You need targeted corrective exercises to reverse these existing structural changes.
Three Foundational Exercises for Dowager's Hump Correction
These three exercises address different components of dowager's hump correction. They begin the correction process, though they're not a complete protocol.
Exercise 1: Deep Neck Release
Why this matters for dowager's hump:
The visible hump often has a cervical (neck) component—your head compensates forward as your upper back rounds. This creates tension at the skull-neck junction that pulls the cervical spine out of alignment.
Equipment:
2 tennis balls in a sock (or massage balls)
How to Perform:
- Lie flat on your back
- Position tennis balls where your skull meets your neck
- Rest your head weight onto the balls (don't lift or tense)
- Gentle nodding motion (small "yes" nods) for 60-90 seconds
- The balls should feel like they're "melting" into tight spots
- Breathe slowly—exhale releases tension
Frequency: 2x daily (morning and evening)
What you'll feel: Deep release in upper neck, improved head position
Form Cues:
- Keep shoulders relaxed and down
- Don't tilt head back—maintain neutral
- Pressure should be deep but tolerable

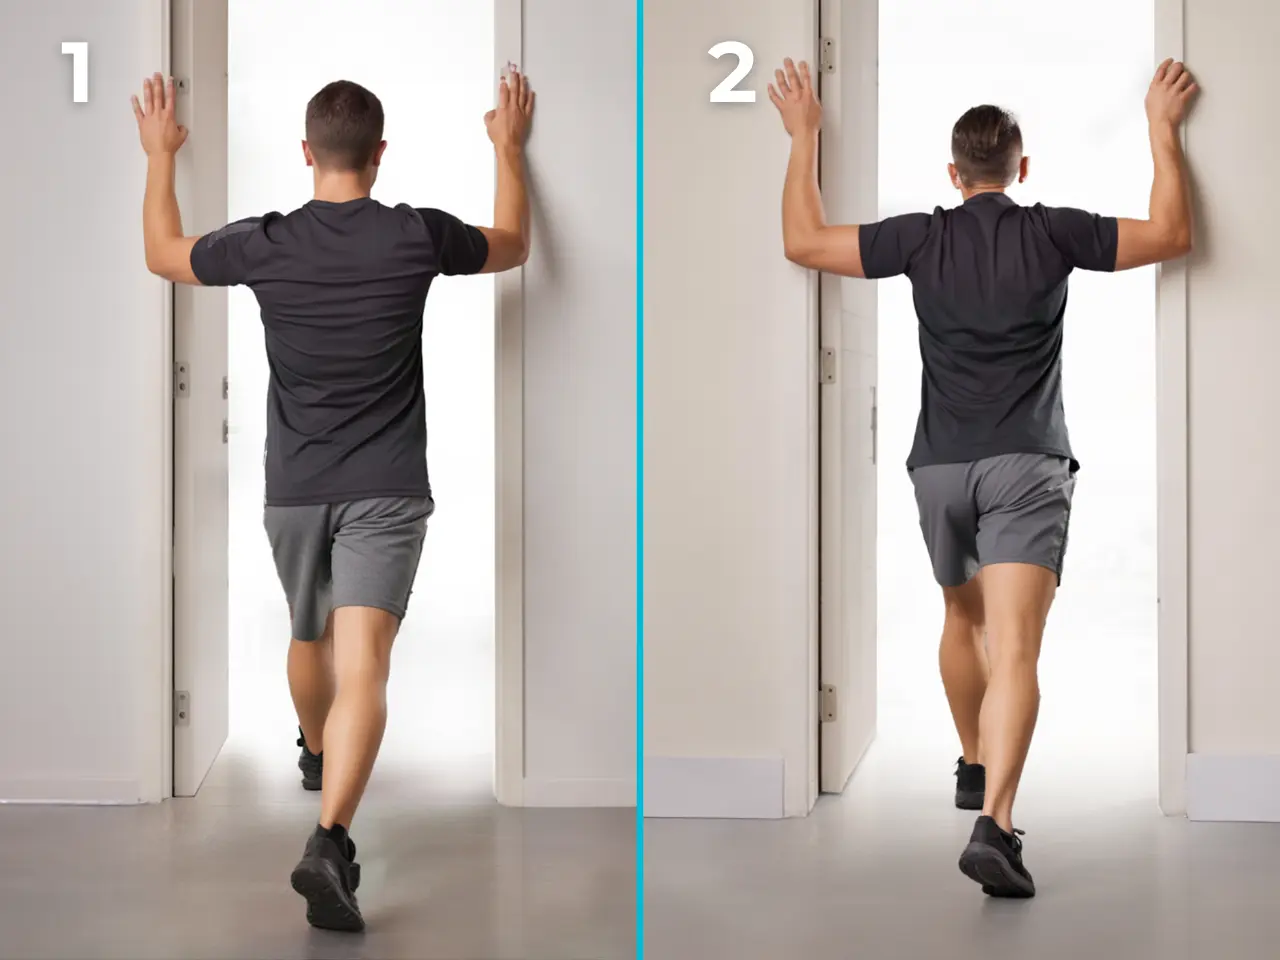
Exercise 2: Chest Opener (Doorway Stretch)
Why this matters for dowager's hump:
Rounded shoulders from tight chest muscles exaggerate the appearance of dowager's hump. Opening the chest allows your shoulders to return to a neutral position, reducing upper back rounding.
Equipment:
Doorway or corner wall
How to Perform:
- Stand facing an open doorway
- Position forearms on doorframe at shoulder level
- Keep elbows at 90-degree angles
- Take a step forward with one foot
- Lean gently forward until you feel stretch across chest
- Maintain upright posture (don't arch lower back)
- Hold 90 seconds (fascia requires extended holds)
- Breathe slowly throughout
- Repeat on opposite side
Frequency: 2-3x daily
What you'll feel: Opening sensation across chest, easier to pull shoulders back
Progression:
- Week 1-2: 90 seconds may feel intense
- Week 3-4: Stretch depth will increase as fascia releases
- Week 5+: Maintain as needed
Form Cues:
- Keep ribs down (don't arch back excessively)
- Shoulders should stay relaxed, not elevated
- Stretch should feel across chest, not in shoulder joint
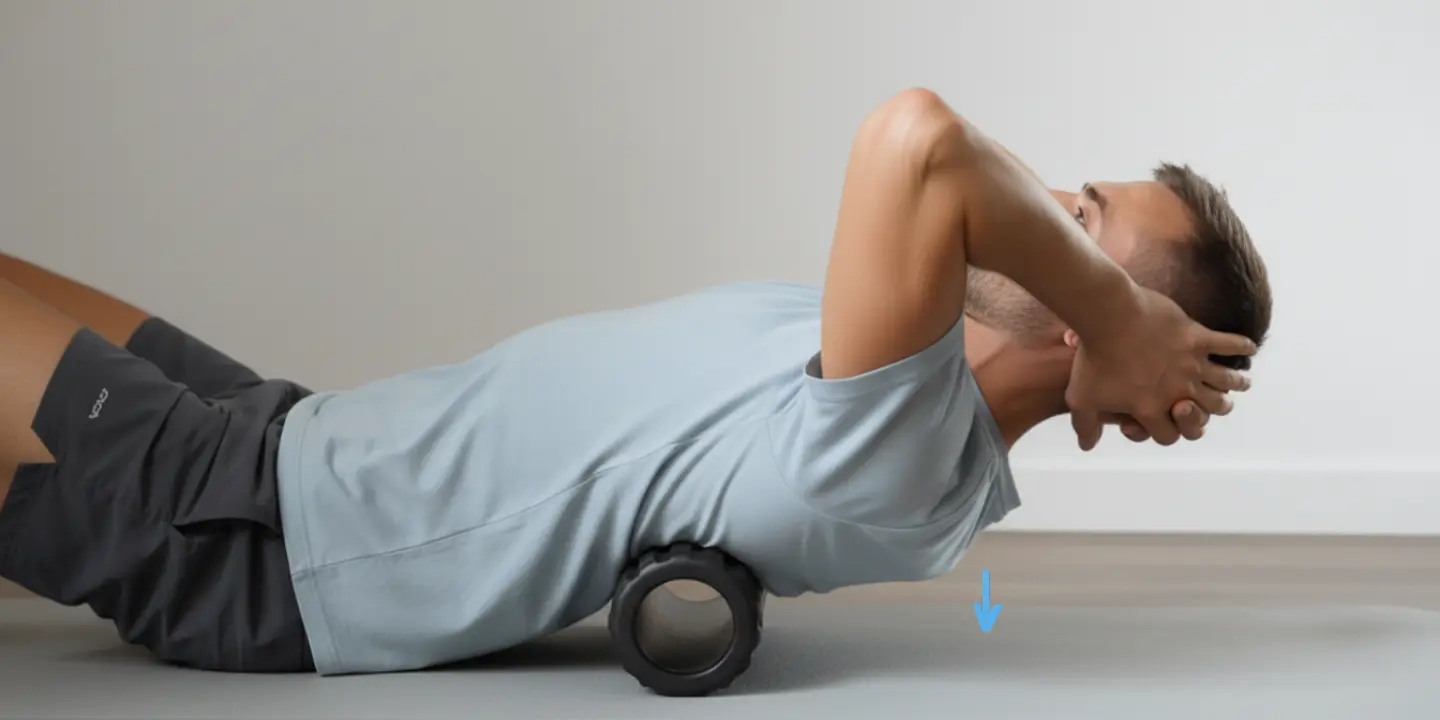
Exercise 3: Upper Back Extension (Foam Roller)
Why this matters for dowager's hump:
This directly addresses the excessive thoracic kyphosis creating the visible hump. Restoring extension range allows your upper back to straighten, reducing hump prominence.
Equipment:
Foam roller (36 inches long) or tightly rolled large towel
How to Perform:
- Lie on your back with foam roller positioned horizontally across mid-back
- Support your head with interlaced fingers, elbows pointing up
- Let your upper back drape backward over the roller—allow extension
- Take 5 slow, deep breaths in this position
- Move roller up 1-2 inches (toward your head)
- Repeat until you've worked from mid-back to just below base of neck
Time: 5-7 minutes total
Frequency: Once daily (best in evening)
What you'll feel: Immediate slight reduction in hump visibility, easier upright posture
Form Cues:
- Don't force extension—let gravity do the work
- Support head throughout (don't let it drop back)
- Stop at base of neck (don't roll onto neck itself)
- If too intense, use softer surface (rolled towel)
WHY THESE THREE EXERCISES ALONE WON'T FIX YOUR HUMP
✓ Immediate relief from upper back tension and stiffness
✓ Begin the correction process by restoring basic mobility
✓ Some improvement in posture and hump appearance
✗ Will NOT achieve 60-90% permanent correction on their own
The Missing Components:
These foundational exercises address basic mobility and release. But complete correction requires progressive strengthening protocols (Levels 2-4), deep neck flexor retraining, scapular stabilization sequences, breathing pattern correction, and targeted strategies for persistent tissue changes.
Most people plateau at 40-50% improvement using basic exercises alone. The remaining reduction requires systematic progression through all corrective phases.
For complete, permanent correction, you need a comprehensive 8-12 week system.
Ready to Eliminate Dowager's Hump Permanently?
The three exercises above provide a foundation and begin the correction process. For complete, permanent results—achieving 60-90% reduction in 8-12 weeks—you need a structured system that addresses all corrective components systematically.
The BaseHealthBlueprint Posture Reset Blueprint includes the complete protocol specifically designed for dowager's hump and forward head posture correction.
See the Complete Solution Now →When to Seek Professional Evaluation
See a healthcare provider if you experience:
Immediate (within 24-48 hours):
- Sharp, shooting pain radiating down arms
- Numbness or tingling in hands/fingers
- Sudden weakness in arms or hands
- Loss of coordination or balance
- Severe headaches with vision changes
Within 1-2 weeks:
- Dowager's hump that appeared rapidly (over weeks, not months)
- Severe breathing restriction from upper back curvature
- Chronic pain not responding to conservative measures
- Progressive worsening despite consistent correction efforts
Medical conditions requiring clearance:
Consult your doctor before starting correction exercises if you have:
- History of spinal fractures or osteoporosis
- Previous neck or upper back surgery
- Diagnosed spinal conditions (severe scoliosis, spinal stenosis)
- Rheumatoid arthritis or other inflammatory conditions
Most dowager's hump cases respond well to conservative correction without medical intervention, but it's important to rule out underlying pathology.